Wart Zapper Project
A Recent History
By now, the Wart Zapper has quite a history behind it. Three different embodiments have been published in three major magazines. It has gone into production in South Africa, and (without my having read the technical details) an embodiment would seem to have gone into production in the USA. In the latter case, it has been advertised also as a cure for cold sores. A major company approached me with a view to manufacture. However, the medical trials and approvals seemed to be too much of a hurdle for me to want to further pursue that avenue.
The Wart Zapper's record has been good. I have received many letters confirming its efficacy -- not to speak of the results that I have witnessed first hand. One writer had a problem getting his unit to work, and I "walked him through" the problems. He replied: "I did another set of 'zaps', and wow!! As per the article, about 3 minutes in, a small wart on my thumb suddenly got quite sore (which I bore with dignity). Et voila!! After about 5 minutes there was a tiny hole burnt in it. This has now formed a hard layer, and I am confident its wave function has collapsed."
A few people had some difficulty obtaining a result at first. This was always where a wart was both large and "dry". In one or two cases, the problem was solved by soaking the wart in the bath, then applying the Wart Zapper. This is also covered below.
Wart Removal
As improbable as it may seem, the common wart may be destroyed with a simple circuit that uses a small 9V PP3 battery delivering a boosted 25V to the skin. Taking into account the resistance of the skin, this translates to just 100µA or so passing through the wart internally, thus delivering a fraction (about one-third) of the peak power delivered by a typical TENS unit. That is, a typical wart may be destroyed with the power that a pocket torch uses in the blink of an eye.
Warts are one of the most common maladies of humankind, yet are often one of the most awkward to cure. In the past, warts were removed by means of curettage (that is, cutting them out), or by burning them off -- sometimes with a hot coal. Often they were simply left alone. One of the more famous quotes of Oliver Cromwell, Lord Protector of England, was, "Paint me warts and all, or not at all!" Due to the habit of warts of suddenly and inexplicably disappearing, it was sometimes thought that charms might effect the cure.
Today, there are three lines of attack to remove warts:
Perhaps the most common is the dreaded liquid nitrogen treatment (also called cryosurgery). However, not only is this messy and painful -- it may in many cases augment the treated warts, or do permanent damage to the skin -- particularly to darker skin.
Chemical treatment is often a long, slow, messy process which requires perseverence and care -- and even then, success is not guaranteed. This may also be couter-productive, and generally cannot be used on the face.
A third method, which is often used in clinics today, is electrodesiccation (or sometimes, "radio frequency thermal ablation") -- that is, burning off warts electrically with several Watts of power. This is tidy, quick, and effective, yet it tends to be expensive, and requires specialist attention. Therefore it is likely to lie beyond the means of people who live in poorer circumstances, or in more remote areas of the world.
What is significantly new about the circuit shown here is that it brings wart removal within the scope of every amateur electronics constructor, using some one thousand times less power than electrodesiccation. For the price of a doctor's consultation for the dreaded liquid nitrogen treatment, or for the price of a single session of electrodesiccation, several Wart Zappers could be built.
The single 9V PP3 battery used by this circuit should be capable of destroying a many warts. In trials, the Wart Zapper proved to be close to 100% effective for the so-called common wart, on condition that this was not too large (that is, if it was less than 5mm across it at its widest point). In particular, the Wart Zapper was very effctive with warts on the hands, which are often the most difficult to remove by other methods. Larger warts may by all means be treated, but these may prove to be more awkward to remove.
Medical History
During the 1950's, Dr. John Crane experimented with the treatment of harmful microbes with electrical pulses. This followed experiments in the 1930's by Dr. Royal Raymond Rife, who used electromagnetic pulses, which yielded some remarkable results. Dr. Rife's original interest was in the design of microscopes, and his discovery of the effects of electromagnetic radiation on microbes came purely by accident as he sought to illuminate specimens under his ever more powerful microscopes.
In short, Dr. Crane claimed to have established that harmful microbes, if pulsed with a small current at a specific frequency, will resonate, thus destroying the microbes, while leaving healthy tissues intact.
Since warts are known to be caused by a group of common viruses, the present design uses a frequency close to one established by Dr. Crane for the treatment of the "wart virus" (21.27kHz). This is used here with suitable voltage and current. It has since been questioned whether Dr. Crane's frequencies are at all significant, or whether any frequencies within a few hundred or even thousand Hertz would work just as well. However, Dr. Crane's original frequency it is, with the important difference that it is applied here directly to a wart, rather than being used as a treatment for the virus.
It is interesting to note that Dr. Crane's frequencies for cancer (sarcoma and carcinoma) lie close to those for the wart virus. This raises the possibility that the Wart Zapper might work for certain cancers. In fact it was tested on a less aggressive form of skin cancer under the eye of a specialist, and it successfully destroyed the cancer. However, the Wart Zapper would not be recommended in such cases, since one cannot afford to take chances with personal experiments on cancers.
The Wart Zapper originally came about by accident. I was experimenting with Crane frequencies to treat a superficial infection that had eluded antibiotics. With a lot of guesswork as to what voltage or current to apply, the treatment was surprisingly and entirely successful -- yet caused a little damage to the skin. What if, I thought, Dr. Crane's frequencies would cause similar damage to warts?
My first prototype yielded patchy results, but these were sufficiently hopeful to know that they were significant. Four successive prototypes were tested on several volunteers, including medical professionals, with the final prototype achieving close to 100% success with the common wart (a brown or skin-coloured, rough wart), as well as some success with other types of wart, such as the plane wart. The Wart Zapper's high success rate does not of course guarantee that it will work in every case. However, it does offer reason for hope that the device would be effective in a great many cases.
Note that, although the Wart Zapper was developed on the theories of Dr. John Crane, and although I have my own "best guess theory" as to why it works, at least five different theories have been put forward as to why it works -- see the sidebar.
Safety and Caution
Despite the very small currents used by this circuit, little is understood about the effects of electricity on the human body, and the Wart Zapper should be used with this caution in mind.
During experiments, I was surprised by the profound effect that miniscule currents may have on the human body. When I was still seeking to establish the correct "exposure" required to destroy a wart, I caused significant damage to a fingernail 7 cm (nearly 3") distant. Similarly, related devices which are used to treat viral infections have been said on occasion to cause e.g. stiffness in a finger joint.
These are rare and relatively minor side-effects, yet it should be borne in mind that the Wart Zapper is capable of doing some damage if misused. Therefore the voltage, current, frequency, and duration of treatment described in this article should not be rashly modified. More than a year's experimentation, and even more "field experience", lies behind this design, and most if not all of the mistakes have hopefully been made.
The Circuit
The Wart Zapper uses a single CMOS 7555 oscillator (IC1), for dual purposes, as follows:
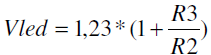
First, it pumps up a standard voltage tripler circuit, represented by the capacitor-diode network to the right of IC1 in the circuit diagram. This takes the voltage up to about 25V, if not a little more. The purpose of increasing the voltage is to overcome the resistance of the skin. According to the well known formula I=V/R, if V (voltage) is increased, while R (resistance -- in this case skin resistance) remains the same, I (current) increases proportionately.
Second, the oscillator switches power MOSFET TR1 at the required frequency, to pulse the raised voltage through the skin by means of two electrodes. One of these electrodes is positive (+25V -- called the dispersive electrode, and marked D. This may either be a metal grip held in the hand, or a metal plate applied to a large(ish) area of skin near a wart. The other electrode is negative (0V -- called the active electrode, and marked A). This is a sharp(ish) metal point which is used for direct contact with the wart. The 470k potentiometer VR1 is inserted into the dispersive electrode's lead to prevent the possibility of a brief electrical jolt at switch-on, or on first applying the active electrode to a wart.
After much experimentation, I settled on a 25V 21kHz square wave (the circuit will approach this to within about 10%), applied to a wart for five minutes. I found that pulses of a minimum 1mW power passing through the wart internally were required to achieve any effect, and that 3mW-6mW pulses were adequate (compare this with the approximately 2W required to illuminate a pocket torch)!
Current across the probes is limited by R3 to less than 3mA, to protect the circuit if these should be short-circuited. One needs also to factor in the conductivity of the flesh, which rarely falls below about 200k -- therefore little more than 100µA, or at most about 200µA, would course through the wart itself.
Zener diode ZD1, together with LED D1 and resistor R1, serve as a simple "battery low" indicator. LED D1 will normally glow dimly, and this must be a green LED -- it is chosen for its so-called forward voltage drop, which differs from that of other coloured LEDs. If this LED goes out, then the battery is flat, and needs to be replaced. C1 serves as a supply decoupling capacitor, and S1 as an on-off switch.
 Construction
The Wart Zapper (see Fig.2) is built on a printed circuit board (PCB) measuring approximately 60mm x 44mm (2.5" x 1.8"). The prototype used a case measuring approximately 100mm x 60mm x 22mm (4" x 2.5" x 1") externally.

Begin by soldering the six solder pins to the PCB. Solder the four resistors, the six capacitors (observing the polarity of electrolytic C1), the Zener diode, the five remaining diodes (including LED D1), and power MOSFET TR1. Then solder the battery leads as shown. The positive lead is taken via switch S1. Be sure to connect the leads the right way round, since a mistake here could destroy the circuit.
 Fix the PCB to the bottom of the case, perhaps with some epoxy glue. A hole is prepared in the case for LED D1, which may be wired directly to the PCB, depending on the layout of the case. The cathode (k) of D1 is identified with a "flat" on the side of its encapsulation. Mount on-off switch S1 on the case.
 Attach a long, plastic sheathed wire to the dispersive electrode (a metal grip or metal plate), and pass this wire through a hole in the case. Make sure that there is sound electrical contact between the wire and the metal grip or plate. Take the free end of this wire to 470k potentiometer VR1, and wire the potentiometer to the PCB as shown. If the potentiometer is viewed from underneath with the terminal pins facing towards you, the two terminal pins on the right need to be wired to each other.

Then attach a long, plastic insulated wire to the active electrode (a sharp pin -- but not too sharp -- the end may be filed flat), and pass this wire through a hole in the case, soldering it also to the PCB as shown. The pin should be inserted in a suitable plastic shaft so that it is not directly touched when treating a wart. Finally, insert and solder IC1 on the PCB, observing anti-static precautions (touch your body to ground before handling, e.g. to a metal tap).
In Use
Removing warts has never been much fun, and the use of the Wart Zapper is likely to be painful -- but only briefly, and not too much (as hinted at in the constructor's letter above).
Considerable experimentation preceded the development of this circuit, and, as mentioned, the results gave me a new respect for the potential risks of electricity, however small the voltages and currents that are applied. Skin resistance can vary between about 100k and 10M, depending on the day and the situation. Therefore, to ensure consistency of results, skin resistance needs to be kept relatively low. Use a little skin moisturiser where the skin makes contact with the dispersive electrode, as well as a little moisturiser on the wart itself.
Constructors are advised not to use the circuit where current would flow across the head or the heart, and never during pregnancy, or where a person uses a pacemaker, or has any history of epilepsy. These are standard safety recommendations for TENS devices, which incidentally use some three times the peak power of the Wart Zapper.
If treating a wart e.g. on the lower or upper arm, hold a metal grip (the dispersive electrode) in the same hand. If it is not convenient to use a grip, rest the limb to be treated (e.g. a foot) on a metal plate instead, which is again connected as the dispersive electrode. The active electrode -- that is, the sharp(ish) metal point -- is rested directly and gently on the top of the wart. If treating a slightly larger wart (say more than 4mm at its widest point), it might be an idea to tackle one or the other side of it first, since the Wart Zapper is unlikely to kill it all at once.
Switch on, apply the Wart Zapper to a wart for up to five minutes (see above), then switch off. Potentiometer VR1 is used to turn up the power slowly to full after switching on -- however, for the brave, it may be turned up full immediately. Be prepared suddenly to experience perhaps half a minute of sharp pain. If you do not see this through until the pain subsides (which it will), the wart may not be destroyed.
Experience and Qualifications
Although most common warts were ultimately removed by the Wart Zapper, it was found that there were some differences in the effect that the device had.
In several cases, a wart was obliterated first time, never to return. These were usually small common warts about 2mm to 4mm at their widest point. However, with close constellations of warts (at first glance looking like a single wart), or with larger warts, the wart was sometimes destroyed in part, but needed follow-up treatments to destroy it all.
In most cases, little or no pain was experienced when the Wart Zapper was first applied, although one subject jumped when the device was first switched on, and another -- a dentist -- suggested a means of controlling the power at switch-on. This is taken care of in the present design with a potentiometer which the patient may slowly turn up once the so-called active electrode is resting on the wart. In most cases, however, this potentiometer would not be missed.
After a certain period of painlessness, which varied from about half a minute to three-and-a-half minutes, subjects suddenly felt a burning or even a "spine-chilling" pain, inside and under the wart. This pain only lasts about half a minute, then subsides. However, it is necessary for the removal of the wart, and needs to be "stuck out". When the pain has subsided (or after five minutes, whichever may come first), the probe is removed.
Be more careful with facial warts, since facial skin is delicate. Rather under-treat such a wart than over-treat it. You may always return to it again later.
Once a wart has been treated, it should immediately be apparent that it is "just not the same". In fact in many cases, the wart melted with a fizzle even before the treatment was over. The skin immediately surrounding the wart may be irritated for a few hours, and there may be a slight swelling close to the wart. Ultimately a scab may form. Don't ever remove a wart too soon, or break its surface, or even agitate it, since this could leave a deep wound, and there could be infection. If it is left alone, there should be no infection. If a treatment should have little or no effect, it would be sensible to consult a doctor.
While this circuit comes with no guarantees, it is no doubt a case nothing ventured, nothing gained! With the help of several willing "guinea-pigs", and further volunteers queuing up, I found that the Wart Zapper was entirely successful most of the time.

Alternate PCB View
Theory and Practise
According to the original theory of Dr. John Crane, alien cells (such as viruses) begin to resonate when bombarded with a specific electrical frequency. Normal chemical processes at the cell boundary are thereby disrupted, or the cell ruptures, thus killing the cell. Healthy tissues are left almost entirely unscathed.
However, this is not the only theory in the running. By way of a process of elimination, I followed up further suggestions put to me by researcher Aubrey Scoon:
1. Electrolysis (a "flat" DC voltage). This also did significant damage to warts - however, it also did immediate, superficial damage to healthy tissues, and the experiment was not repeated. The conclusion is that electrolysis may contribute to the destruction of warts, but it does not offer an adequate explanation for the Wart Remover's success.
2. Iontophoresis. This is the leaching of ions into a wart, which effectively kills the wart by poisoning. However, after experimenting with a variety of conductive electrodes, as well as graphite (all the electrodes were tried with success), this theory was safely ruled out.
3. The stimulation of immunomodulatory chemicals. The theory is that these chemicals, when stimulated by an electrical frequency, attack the wart and destroy it. However, this would be hard to explain in light of the spectacular destruction of some warts. In some cases, the Wart Eliminator appeared to explode wart cells, and this could on occasion even be heard! Finally,
4. Frictional heating. Ionic agitation may raise the temperature within a wart, causing tissue coagulation. While I had no way of testing this theory, I thought it unlikely. Electrodesiccation typically raises the temperature within a wart above 47°C, and this requires a few Watts of power. Since the Wart Remover pulses just one-thousandth as much power through a wart, this possibility would seem less probable.
Parts List
Qty Part
1 Copper clad board 60mm x 44mm (2.5" x 1.8")
1 9V PP3 "matchbox" battery
1 Battery clip for battery - or suitable case with internal battery terminals
1 Panel mounting on-off switch
1 Suitable ABS plastic case approx. 100mm x 60mm x 22mm (4" x 2.5" x 1") external
1 1 metre (1 yard) plastic shielded wire for the electrodes
1 15 cm (6") long brass tube for the dispersive electrode
1 Needle sharp tip filed off - for the active electrode
1 8-pin dual-in-line (DIL) socket (not required for experienced constructors)
6 Solder pins
1 Etchant if a PCB needs to be etched
1 Solder
Semiconductors
1 6.8V Zener diode (¼-Watt is adequate)
1 Green LED (no other colour)
4 1N4148 signal diodes
1 IRF610 power "logic" MOSFET (alternatively IRF510, BUZ11, BUZ22)
1 7555 CMOS timer IC
Resistors
2 1k ¼-Watt carbon or metal film
1 47k ¼-Watt carbon or metal film
1 10k ¼-Watt crbon or metal film
1 470k or 500k potentiometer, carbon track or conductive plastic
1 Knob for potentiometer
Capacitors
1 680pF polyester or ceramic
2 100nF polyester or ceramic
2 220nF polyester or ceramic
1 100µF electrolytic 16V or higher
author: Thomas Scarborough
e-mail:
web site: http://www.zen22142.zen.co.uk
By now, the Wart Zapper has quite a history behind it. Three different embodiments have been published in three major magazines. It has gone into production in South Africa, and (without my having read the technical details) an embodiment would seem to have gone into production in the USA. In the latter case, it has been advertised also as a cure for cold sores. A major company approached me with a view to manufacture. However, the medical trials and approvals seemed to be too much of a hurdle for me to want to further pursue that avenue.
The Wart Zapper's record has been good. I have received many letters confirming its efficacy -- not to speak of the results that I have witnessed first hand. One writer had a problem getting his unit to work, and I "walked him through" the problems. He replied: "I did another set of 'zaps', and wow!! As per the article, about 3 minutes in, a small wart on my thumb suddenly got quite sore (which I bore with dignity). Et voila!! After about 5 minutes there was a tiny hole burnt in it. This has now formed a hard layer, and I am confident its wave function has collapsed."
A few people had some difficulty obtaining a result at first. This was always where a wart was both large and "dry". In one or two cases, the problem was solved by soaking the wart in the bath, then applying the Wart Zapper. This is also covered below.
Wart Removal
As improbable as it may seem, the common wart may be destroyed with a simple circuit that uses a small 9V PP3 battery delivering a boosted 25V to the skin. Taking into account the resistance of the skin, this translates to just 100µA or so passing through the wart internally, thus delivering a fraction (about one-third) of the peak power delivered by a typical TENS unit. That is, a typical wart may be destroyed with the power that a pocket torch uses in the blink of an eye.
Warts are one of the most common maladies of humankind, yet are often one of the most awkward to cure. In the past, warts were removed by means of curettage (that is, cutting them out), or by burning them off -- sometimes with a hot coal. Often they were simply left alone. One of the more famous quotes of Oliver Cromwell, Lord Protector of England, was, "Paint me warts and all, or not at all!" Due to the habit of warts of suddenly and inexplicably disappearing, it was sometimes thought that charms might effect the cure.
Today, there are three lines of attack to remove warts:
Perhaps the most common is the dreaded liquid nitrogen treatment (also called cryosurgery). However, not only is this messy and painful -- it may in many cases augment the treated warts, or do permanent damage to the skin -- particularly to darker skin.
Chemical treatment is often a long, slow, messy process which requires perseverence and care -- and even then, success is not guaranteed. This may also be couter-productive, and generally cannot be used on the face.
A third method, which is often used in clinics today, is electrodesiccation (or sometimes, "radio frequency thermal ablation") -- that is, burning off warts electrically with several Watts of power. This is tidy, quick, and effective, yet it tends to be expensive, and requires specialist attention. Therefore it is likely to lie beyond the means of people who live in poorer circumstances, or in more remote areas of the world.
What is significantly new about the circuit shown here is that it brings wart removal within the scope of every amateur electronics constructor, using some one thousand times less power than electrodesiccation. For the price of a doctor's consultation for the dreaded liquid nitrogen treatment, or for the price of a single session of electrodesiccation, several Wart Zappers could be built.
The single 9V PP3 battery used by this circuit should be capable of destroying a many warts. In trials, the Wart Zapper proved to be close to 100% effective for the so-called common wart, on condition that this was not too large (that is, if it was less than 5mm across it at its widest point). In particular, the Wart Zapper was very effctive with warts on the hands, which are often the most difficult to remove by other methods. Larger warts may by all means be treated, but these may prove to be more awkward to remove.
Medical History
During the 1950's, Dr. John Crane experimented with the treatment of harmful microbes with electrical pulses. This followed experiments in the 1930's by Dr. Royal Raymond Rife, who used electromagnetic pulses, which yielded some remarkable results. Dr. Rife's original interest was in the design of microscopes, and his discovery of the effects of electromagnetic radiation on microbes came purely by accident as he sought to illuminate specimens under his ever more powerful microscopes.
In short, Dr. Crane claimed to have established that harmful microbes, if pulsed with a small current at a specific frequency, will resonate, thus destroying the microbes, while leaving healthy tissues intact.
Since warts are known to be caused by a group of common viruses, the present design uses a frequency close to one established by Dr. Crane for the treatment of the "wart virus" (21.27kHz). This is used here with suitable voltage and current. It has since been questioned whether Dr. Crane's frequencies are at all significant, or whether any frequencies within a few hundred or even thousand Hertz would work just as well. However, Dr. Crane's original frequency it is, with the important difference that it is applied here directly to a wart, rather than being used as a treatment for the virus.
It is interesting to note that Dr. Crane's frequencies for cancer (sarcoma and carcinoma) lie close to those for the wart virus. This raises the possibility that the Wart Zapper might work for certain cancers. In fact it was tested on a less aggressive form of skin cancer under the eye of a specialist, and it successfully destroyed the cancer. However, the Wart Zapper would not be recommended in such cases, since one cannot afford to take chances with personal experiments on cancers.
The Wart Zapper originally came about by accident. I was experimenting with Crane frequencies to treat a superficial infection that had eluded antibiotics. With a lot of guesswork as to what voltage or current to apply, the treatment was surprisingly and entirely successful -- yet caused a little damage to the skin. What if, I thought, Dr. Crane's frequencies would cause similar damage to warts?
My first prototype yielded patchy results, but these were sufficiently hopeful to know that they were significant. Four successive prototypes were tested on several volunteers, including medical professionals, with the final prototype achieving close to 100% success with the common wart (a brown or skin-coloured, rough wart), as well as some success with other types of wart, such as the plane wart. The Wart Zapper's high success rate does not of course guarantee that it will work in every case. However, it does offer reason for hope that the device would be effective in a great many cases.
Note that, although the Wart Zapper was developed on the theories of Dr. John Crane, and although I have my own "best guess theory" as to why it works, at least five different theories have been put forward as to why it works -- see the sidebar.
Safety and Caution
Despite the very small currents used by this circuit, little is understood about the effects of electricity on the human body, and the Wart Zapper should be used with this caution in mind.
During experiments, I was surprised by the profound effect that miniscule currents may have on the human body. When I was still seeking to establish the correct "exposure" required to destroy a wart, I caused significant damage to a fingernail 7 cm (nearly 3") distant. Similarly, related devices which are used to treat viral infections have been said on occasion to cause e.g. stiffness in a finger joint.
These are rare and relatively minor side-effects, yet it should be borne in mind that the Wart Zapper is capable of doing some damage if misused. Therefore the voltage, current, frequency, and duration of treatment described in this article should not be rashly modified. More than a year's experimentation, and even more "field experience", lies behind this design, and most if not all of the mistakes have hopefully been made.
The Circuit
The Wart Zapper uses a single CMOS 7555 oscillator (IC1), for dual purposes, as follows:
First, it pumps up a standard voltage tripler circuit, represented by the capacitor-diode network to the right of IC1 in the circuit diagram. This takes the voltage up to about 25V, if not a little more. The purpose of increasing the voltage is to overcome the resistance of the skin. According to the well known formula I=V/R, if V (voltage) is increased, while R (resistance -- in this case skin resistance) remains the same, I (current) increases proportionately.
Second, the oscillator switches power MOSFET TR1 at the required frequency, to pulse the raised voltage through the skin by means of two electrodes. One of these electrodes is positive (+25V -- called the dispersive electrode, and marked D. This may either be a metal grip held in the hand, or a metal plate applied to a large(ish) area of skin near a wart. The other electrode is negative (0V -- called the active electrode, and marked A). This is a sharp(ish) metal point which is used for direct contact with the wart. The 470k potentiometer VR1 is inserted into the dispersive electrode's lead to prevent the possibility of a brief electrical jolt at switch-on, or on first applying the active electrode to a wart.
After much experimentation, I settled on a 25V 21kHz square wave (the circuit will approach this to within about 10%), applied to a wart for five minutes. I found that pulses of a minimum 1mW power passing through the wart internally were required to achieve any effect, and that 3mW-6mW pulses were adequate (compare this with the approximately 2W required to illuminate a pocket torch)!
Current across the probes is limited by R3 to less than 3mA, to protect the circuit if these should be short-circuited. One needs also to factor in the conductivity of the flesh, which rarely falls below about 200k -- therefore little more than 100µA, or at most about 200µA, would course through the wart itself.
Zener diode ZD1, together with LED D1 and resistor R1, serve as a simple "battery low" indicator. LED D1 will normally glow dimly, and this must be a green LED -- it is chosen for its so-called forward voltage drop, which differs from that of other coloured LEDs. If this LED goes out, then the battery is flat, and needs to be replaced. C1 serves as a supply decoupling capacitor, and S1 as an on-off switch.

The Wart Zapper (see Fig.2) is built on a printed circuit board (PCB) measuring approximately 60mm x 44mm (2.5" x 1.8"). The prototype used a case measuring approximately 100mm x 60mm x 22mm (4" x 2.5" x 1") externally.

Begin by soldering the six solder pins to the PCB. Solder the four resistors, the six capacitors (observing the polarity of electrolytic C1), the Zener diode, the five remaining diodes (including LED D1), and power MOSFET TR1. Then solder the battery leads as shown. The positive lead is taken via switch S1. Be sure to connect the leads the right way round, since a mistake here could destroy the circuit.


Then attach a long, plastic insulated wire to the active electrode (a sharp pin -- but not too sharp -- the end may be filed flat), and pass this wire through a hole in the case, soldering it also to the PCB as shown. The pin should be inserted in a suitable plastic shaft so that it is not directly touched when treating a wart. Finally, insert and solder IC1 on the PCB, observing anti-static precautions (touch your body to ground before handling, e.g. to a metal tap).
In Use
Removing warts has never been much fun, and the use of the Wart Zapper is likely to be painful -- but only briefly, and not too much (as hinted at in the constructor's letter above).
Considerable experimentation preceded the development of this circuit, and, as mentioned, the results gave me a new respect for the potential risks of electricity, however small the voltages and currents that are applied. Skin resistance can vary between about 100k and 10M, depending on the day and the situation. Therefore, to ensure consistency of results, skin resistance needs to be kept relatively low. Use a little skin moisturiser where the skin makes contact with the dispersive electrode, as well as a little moisturiser on the wart itself.
Constructors are advised not to use the circuit where current would flow across the head or the heart, and never during pregnancy, or where a person uses a pacemaker, or has any history of epilepsy. These are standard safety recommendations for TENS devices, which incidentally use some three times the peak power of the Wart Zapper.
If treating a wart e.g. on the lower or upper arm, hold a metal grip (the dispersive electrode) in the same hand. If it is not convenient to use a grip, rest the limb to be treated (e.g. a foot) on a metal plate instead, which is again connected as the dispersive electrode. The active electrode -- that is, the sharp(ish) metal point -- is rested directly and gently on the top of the wart. If treating a slightly larger wart (say more than 4mm at its widest point), it might be an idea to tackle one or the other side of it first, since the Wart Zapper is unlikely to kill it all at once.
Switch on, apply the Wart Zapper to a wart for up to five minutes (see above), then switch off. Potentiometer VR1 is used to turn up the power slowly to full after switching on -- however, for the brave, it may be turned up full immediately. Be prepared suddenly to experience perhaps half a minute of sharp pain. If you do not see this through until the pain subsides (which it will), the wart may not be destroyed.
Experience and Qualifications
Although most common warts were ultimately removed by the Wart Zapper, it was found that there were some differences in the effect that the device had.
In several cases, a wart was obliterated first time, never to return. These were usually small common warts about 2mm to 4mm at their widest point. However, with close constellations of warts (at first glance looking like a single wart), or with larger warts, the wart was sometimes destroyed in part, but needed follow-up treatments to destroy it all.
In most cases, little or no pain was experienced when the Wart Zapper was first applied, although one subject jumped when the device was first switched on, and another -- a dentist -- suggested a means of controlling the power at switch-on. This is taken care of in the present design with a potentiometer which the patient may slowly turn up once the so-called active electrode is resting on the wart. In most cases, however, this potentiometer would not be missed.
After a certain period of painlessness, which varied from about half a minute to three-and-a-half minutes, subjects suddenly felt a burning or even a "spine-chilling" pain, inside and under the wart. This pain only lasts about half a minute, then subsides. However, it is necessary for the removal of the wart, and needs to be "stuck out". When the pain has subsided (or after five minutes, whichever may come first), the probe is removed.
Be more careful with facial warts, since facial skin is delicate. Rather under-treat such a wart than over-treat it. You may always return to it again later.
Once a wart has been treated, it should immediately be apparent that it is "just not the same". In fact in many cases, the wart melted with a fizzle even before the treatment was over. The skin immediately surrounding the wart may be irritated for a few hours, and there may be a slight swelling close to the wart. Ultimately a scab may form. Don't ever remove a wart too soon, or break its surface, or even agitate it, since this could leave a deep wound, and there could be infection. If it is left alone, there should be no infection. If a treatment should have little or no effect, it would be sensible to consult a doctor.
While this circuit comes with no guarantees, it is no doubt a case nothing ventured, nothing gained! With the help of several willing "guinea-pigs", and further volunteers queuing up, I found that the Wart Zapper was entirely successful most of the time.

Alternate PCB View
Theory and Practise
According to the original theory of Dr. John Crane, alien cells (such as viruses) begin to resonate when bombarded with a specific electrical frequency. Normal chemical processes at the cell boundary are thereby disrupted, or the cell ruptures, thus killing the cell. Healthy tissues are left almost entirely unscathed.
However, this is not the only theory in the running. By way of a process of elimination, I followed up further suggestions put to me by researcher Aubrey Scoon:
1. Electrolysis (a "flat" DC voltage). This also did significant damage to warts - however, it also did immediate, superficial damage to healthy tissues, and the experiment was not repeated. The conclusion is that electrolysis may contribute to the destruction of warts, but it does not offer an adequate explanation for the Wart Remover's success.
2. Iontophoresis. This is the leaching of ions into a wart, which effectively kills the wart by poisoning. However, after experimenting with a variety of conductive electrodes, as well as graphite (all the electrodes were tried with success), this theory was safely ruled out.
3. The stimulation of immunomodulatory chemicals. The theory is that these chemicals, when stimulated by an electrical frequency, attack the wart and destroy it. However, this would be hard to explain in light of the spectacular destruction of some warts. In some cases, the Wart Eliminator appeared to explode wart cells, and this could on occasion even be heard! Finally,
4. Frictional heating. Ionic agitation may raise the temperature within a wart, causing tissue coagulation. While I had no way of testing this theory, I thought it unlikely. Electrodesiccation typically raises the temperature within a wart above 47°C, and this requires a few Watts of power. Since the Wart Remover pulses just one-thousandth as much power through a wart, this possibility would seem less probable.
Parts List
Qty Part
1 Copper clad board 60mm x 44mm (2.5" x 1.8")
1 9V PP3 "matchbox" battery
1 Battery clip for battery - or suitable case with internal battery terminals
1 Panel mounting on-off switch
1 Suitable ABS plastic case approx. 100mm x 60mm x 22mm (4" x 2.5" x 1") external
1 1 metre (1 yard) plastic shielded wire for the electrodes
1 15 cm (6") long brass tube for the dispersive electrode
1 Needle sharp tip filed off - for the active electrode
1 8-pin dual-in-line (DIL) socket (not required for experienced constructors)
6 Solder pins
1 Etchant if a PCB needs to be etched
1 Solder
Semiconductors
1 6.8V Zener diode (¼-Watt is adequate)
1 Green LED (no other colour)
4 1N4148 signal diodes
1 IRF610 power "logic" MOSFET (alternatively IRF510, BUZ11, BUZ22)
1 7555 CMOS timer IC
Resistors
2 1k ¼-Watt carbon or metal film
1 47k ¼-Watt carbon or metal film
1 10k ¼-Watt crbon or metal film
1 470k or 500k potentiometer, carbon track or conductive plastic
1 Knob for potentiometer
Capacitors
1 680pF polyester or ceramic
2 100nF polyester or ceramic
2 220nF polyester or ceramic
1 100µF electrolytic 16V or higher
author: Thomas Scarborough
e-mail:
web site: http://www.zen22142.zen.co.uk